Authentication in React Applications, Part 1: Creating Components
React is a JavaScript library for building easy-to-maintain user interfaces. It was created by Facebook and Instagram engineers and made public in May 2013.
Why was React created? Apparently, engineers were unhappy with existing solutions. Libraries can be slow, do too little or too much. The code written using them can be hard to maintain. One of the main ideas behind React is that every DOM manipulation takes place in its own fast Virtual DOM and only after comparison with the old state of real DOM, decides to update changed elements. React is not bundled with a bunch of modules like an AJAX client. React doesn’t care how will you receive the data, it only cares about how to render components, how to process events and when to execute operations (before the rendering, or after it).
In this series of tutorials, we will implement an authentication layer in a small React application. The tutorial has been split into two parts:
- ‘Creating Components’. In this part, we will install dependencies for our project and create a basic application server and essential React components. We will add handlers for AJAX requests on a server side and validate them.
- ‘JSON Web Token’. In this part, we will focus on a user registration using an email address. For authentication, we will use JSON Web Token (JWT).
I’m not sure if the tutorial will be suitable for beginners in programming or JavaScript. But I hope it will be useful for readers who is pretty comfortable with JavaScript. And a command line interface and Node as well.
Installing Dependencies
In this series of tutorials, we will use only essential packages to get running. So we will leave out CSS preprocessors and template engines in this tutorial. And seriously you don’t need another library just to perform AJAX requests.
At the time of writing, I used node 6.9.1 which is packed with npm 3.10.8.
Let's quick review dependencies:
- express is a lightweight web application framework we will base our app on. It's probably the most popular solution in the Node environment
- body-parser is an HTTP message body parser
- react is a library for building user interfaces
- react-dom is a package for React for the DOM rendering
- react-router is a routing library for React-based applications
- react-tap-event-plugin is a plugin for fixing tap delay for touch devices
- validator is a library we will use for a user input validation
- material-ui is a set of React components that follows Google's Material Design guidelines
- webpack is a module bundler we will use for building our React application
- babel-core, babel-loader, and babel-preset-es2015 are parts of Babel, that is useful for transforming a modern ES2015 code to a cross-browser solution
- babel-preset-react is a Babel preset for all React plugins
- nodemon is a wrapper for Node that monitor changes in an application code and automatically restart the server
In your project directory initialize a Node project by typing:
$ npm initYou can leave all options as default or customize as you need.
Now let’s install the packages:
$ npm i --save express body-parser react react-dom react-router material-ui react-tap-event-plugin validator
$ npm i --save-dev webpack babel-core babel-loader babel-preset-es2015 babel-preset-react nodemon
After installing all packages, my package.json file has looked almost like this:
{
  "name": "authentication-in-react-apps",
  "version": "1.0.0",
  "description": "Authentication in React Applications, Part 1: Creating Components",
  "main": "index.js",
  "scripts": {
    "start": "nodemon --use_strict index.js",
    "bundle": "webpack"
  },
  "repository": {
    "type": "git",
    "url": "https://github.com/vladimirponomarev/authentication-in-react-apps.git"
  },
  "author": "Vladimir Ponomarev",
  "license": "MIT",
  "dependencies": {
    "body-parser": "^1.15.2",
    "express": "^4.14.0",
    "material-ui": "^0.16.4",
    "react": "^15.4.1",
    "react-dom": "^15.4.1",
    "react-router": "^3.0.0",
    "react-tap-event-plugin": "^2.0.1",
    "validator": "^6.2.0"
  },
  "devDependencies": {
    "babel-core": "^6.18.2",
    "babel-loader": "^6.2.8",
    "babel-preset-es2015": "^6.18.0",
    "babel-preset-react": "^6.16.0",
    "nodemon": "^1.11.0",
    "webpack": "^1.13.3"
  }
}
Notice, I added two lines to the scripts section:
{
  "scripts": {
    "start": "nodemon --use_strict index.js",
    "bundle": "webpack"
  }
}
The first command is for starting the application in the strict mode. The second one is for bundling client-side scripts by Webpack.
Project Directory Structure
At the end of this part of tutorial, the application will have the next directory structure:
.
├── README.md
├── client
│   └── src
│       ├── app.jsx
│       ├── components
│       │   ├── Base.jsx
│       │   ├── HomePage.jsx
│       │   ├── LoginForm.jsx
│       │   └── SignUpForm.jsx
│       ├── containers
│       │   ├── LoginPage.jsx
│       │   └── SignUpPage.jsx
│       └── routes.js
├── index.js
├── package.json
├── server
│   ├── routes
│   │   └── auth.js
│   └── static
│       ├── css
│       │   └── style.css
│       └── index.html
└── webpack.config.js
Hello from React
The first thing we need to do is create an entry file for the application. Here is the index.js file:
const express = require('express');

const app = express();
// tell the app to look for static files in these directories
app.use(express.static('./server/static/'));
app.use(express.static('./client/dist/'));

// start the server
app.listen(3000, () => {
  console.log('Server is running on http://localhost:3000 or http://127.0.0.1:3000');
});
Notice we haven’t specified the route for root path. Express will look for an index.html file located in the server/static directory. For this file we will use a simple HTML layout like below:
<!DOCTYPE html>
<html>
<head>
  <meta charset="utf-8">
  <title>React App</title>
  <link rel="stylesheet" href="/css/style.css">
</head>
<body>
  <div id="react-app"></div>

  <script src="/js/app.js"></script>
</body>
</html>
And the stylesheet file. Many of the rules we will use later.
body {
margin: 0;
font-size: 16px;
}
a {
color: #00bcd4;
font-weight: bold;
text-decoration: none;
transition: color 0.4s;
}
a:hover {
color: #1976d2;
}
.text-center {
text-align: center;
}
.top-bar {
padding: 10px 15px;
margin-bottom: 50px;
}
.top-bar::after {
content: '';
display: block;
clear: both;
}
.top-bar-left {
float: left;
font-size: 1.5em;
}
.top-bar-right {
float: right;
}
.top-bar a,
.nav a {
margin: 0 8px;
}
.container {
margin: 0 auto;
text-align: center;
width: 700px;
}
.card-heading {
padding: 16px;
}
.field-line, .button-line {
padding: 16px;
}
.error-message {
padding: 0 16px;
color: tomato;
}
.success-message {
padding: 0 16px;
color: green;
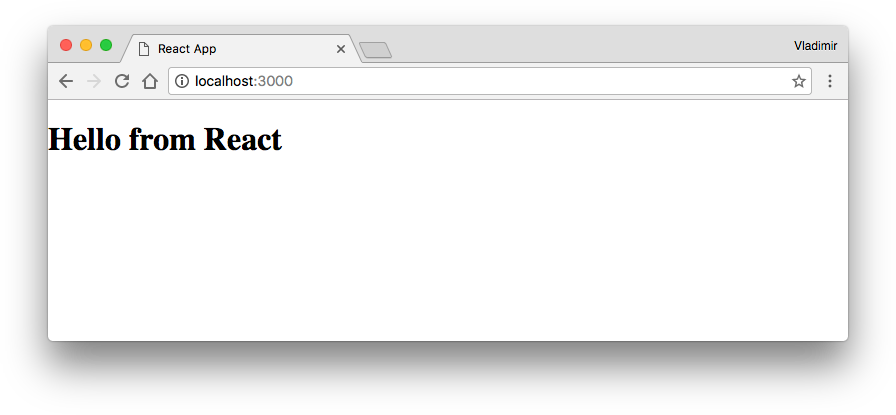
}Let’s build our first React app. Create a file client/src/app.jsx:
import React from 'react';
import ReactDom from 'react-dom';

ReactDom.render(<h1>Hello from React</h1>, document.getElementById('react-app'));
You’re probably confused by the HTML tag passed as the function argument. Well, it’s not HTML, it’s JSX, a XML-like syntax extension to ECMAScript. JSX is not supported by any browsers, we have to transform it to a plain JavaScript. For this task, we will use a Babel plugin.
In our case, the string with JSX will be transformed to this:
// original string
ReactDom.render(<h1>Hello from React</h1>, document.getElementById('react-app'));

// transformed string
ReactDom.render(React.createElement('h1', null, 'Hello from React'), document.getElementById('react-app'));
The second argument, which is now simply null, is for passing HTML tag attributes. We will see a usage of them later. It’s not necessarily to use JSX though it’s a commonly recommended way of writing React code.
To bundle React from npm and transform the JSX template to a plain script, which we will serve to a browser, we will use Webpack with the Babel loader. Webpack is not the only option to do the same task. It’s also possible to use Browserify but it’s out of the scope of this tutorial.
Let’s create a config file for Webpack and review it. Save the config in webpack.config.js in the root directory of the project.
const path = require('path');


module.exports = {
  // the entry file for the bundle
  entry: path.join(__dirname, '/client/src/app.jsx'),

  // the bundle file we will get in the result
  output: {
    path: path.join(__dirname, '/client/dist/js'),
    filename: 'app.js',
  },

  module: {

    // apply loaders to files that meet given conditions
    loaders: [{
      test: /\.jsx?$/,
      include: path.join(__dirname, '/client/src'),
      loader: 'babel',
      query: {
        presets: ["react", "es2015"]
      }
    }],
  },

  // start Webpack in a watch mode, so Webpack will rebuild the bundle on changes
  watch: true
};
In the config, we have set the loader plugins that will only apply to the files matching the regular expression. The expression is set in the test property of the passed object in the given directory (the property include). For these files we will use Babel with presets: ‘react’ and ‘es2015’. The preset ‘es2015’ will set Babel to compile the ES2015 code to ES5 in order to get to the application a cross-browser support.
Let’s see our simple app in action. In your terminal open two windows (or tabs) and go to the project root directory. In the first window, run:
$ npm startAnd in the second window, run:
$ npm run bundleOr if you installed Webpack globally, you may bundle scripts by typing webpack in the command line in the root directory of the project.
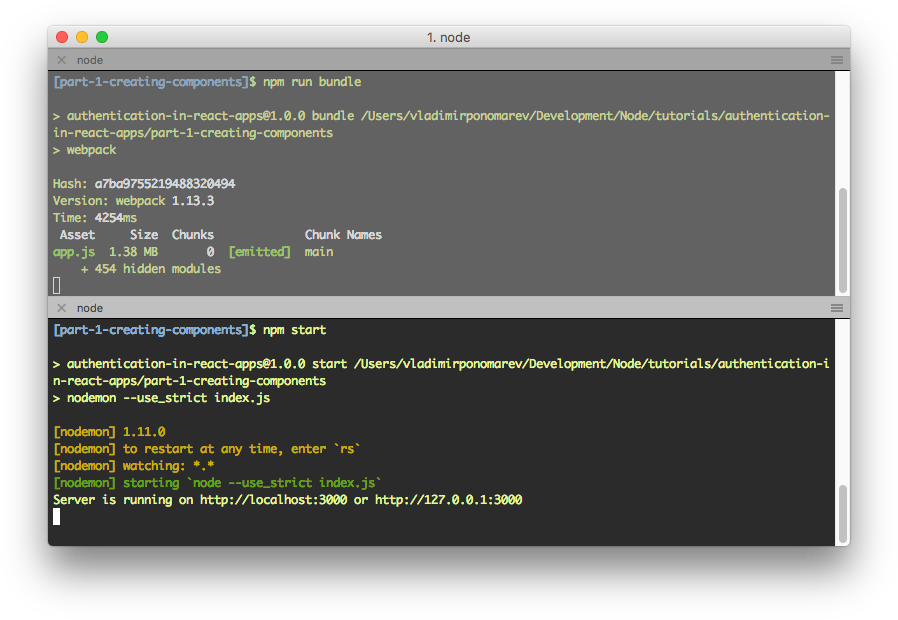
Now in your browser, go to http://127.0.0.1:3000 (or http://localhost:3000). If everything is okay you should see:
Creating Presentational Components
Before we get started we should understand what React components are. Components are the individual building blocks of UI. For example, an input field may be one of the components of the form. The whole form is also a component of a contact page on a site.
A very interesting pattern to consider while creating components is dividing them into two categories. They called Container and Presentational components. Presentational components focus on how things look and Container components focus on how things work.
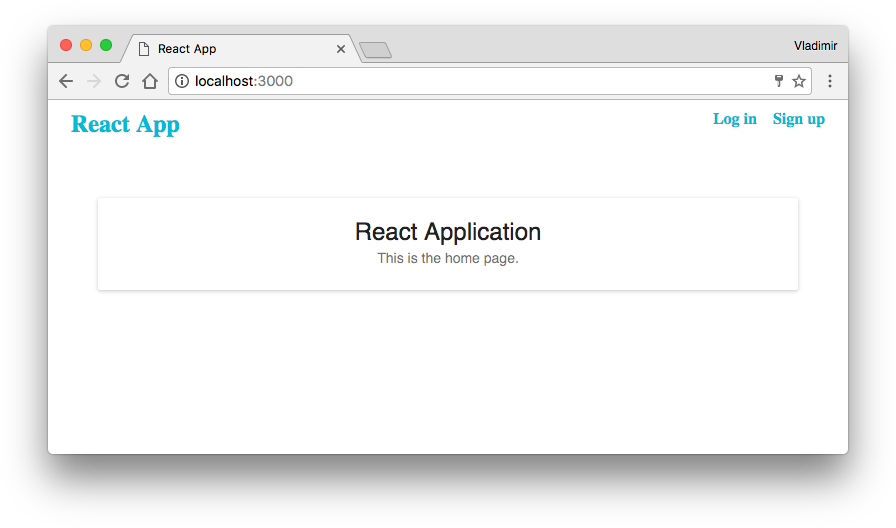
Let’s create and review our first presentational component for the home page:
import React from 'react';
import { Card, CardTitle } from 'material-ui/Card';


const HomePage = () => (
  <Card className="container">
    <CardTitle title="React Application" subtitle="This is the home page." />
  </Card>
);

export default HomePage;
Since JSX is JavaScript, the class keyword already reserved, so instead of it, we have to use the className attribute. Another example is the for attribute, instead of it, we write htmlFor.
Our presentational component uses Material UI’s components like Card and CardTitle. You may think of Material UI’s components like of elements with predefined behavior and CSS styles. Our component renders the simple text as a title and subtitle.
An important notice: a component should have one root element (in our case this element is the Card component). Writing multiple components without a single parent is a syntax error.
That’s it, we have defined the simple presentational component. Usually, it’s just a function that returns the markup. If we would want to render this component right now, we would need to import it, and then pass the component to the ReactDom’s render method like this:
...
import HomePage from './components/HomePage.jsx';


ReactDom.render(<HomePage />, document.getElementById('react-app'));
Now we will create a much more complex presentational component for the sign-up form:
import React, { PropTypes } from 'react';
import { Link } from 'react-router';
import { Card, CardText } from 'material-ui/Card';
import RaisedButton from 'material-ui/RaisedButton';
import TextField from 'material-ui/TextField';


const SignUpForm = ({
  onSubmit,
  onChange,
  errors,
  user,
}) => (
  <Card className="container">
    <form action="/" onSubmit={onSubmit}>
      <h2 className="card-heading">Sign Up</h2>

      {errors.summary && <p className="error-message">{errors.summary}</p>}

      <div className="field-line">
        <TextField
          floatingLabelText="Name"
          name="name"
          errorText={errors.name}
          onChange={onChange}
          value={user.name}
        />
      </div>

      <div className="field-line">
        <TextField
          floatingLabelText="Email"
          name="email"
          errorText={errors.email}
          onChange={onChange}
          value={user.email}
        />
      </div>

      <div className="field-line">
        <TextField
          floatingLabelText="Password"
          type="password"
          name="password"
          onChange={onChange}
          errorText={errors.password}
          value={user.password}
        />
      </div>

      <div className="button-line">
        <RaisedButton type="submit" label="Create New Account" primary />
      </div>

      <CardText>Already have an account? <Link to={'/login'}>Log in</Link></CardText>
    </form>
  </Card>
);

SignUpForm.propTypes = {
  onSubmit: PropTypes.func.isRequired,
  onChange: PropTypes.func.isRequired,
  errors: PropTypes.object.isRequired,
  user: PropTypes.object.isRequired
};

export default SignUpForm;
Let’s review the component step-by-step.
Notice the extracted variables from the object passed as a function argument. It’s how we get data to show in a presentational component. We have four variables, onSubmit and onChange are event handler functions, errors and users are objects containing data. How can we pass an object to extract variables from? Each element can be passed as a property (in React properties simply called props):
<SignUpForm
  onSubmit={(e) => console.log('submitted')}
  onChange={(e) => console.log('changed')}
  errors={{ email: 'Invalid' }}
  user={{ email: 'jane@doe.com', name: 'Jane Doe' }}
/>
In the form tag, you can see the usage of the function stored in the onSubmit variable for the form submission event.
Since if conditions don’t work inside of JSX, we use statements like this:
{errors.summary && <p className="error-message">{errors.summary}</p>}The element will be shown only if the property errors.summary contains something or equals true.
Components like TextField, RaisedButton, CardText are parts of the Material UI library. These components are not only nice-looking elements but also have useful features. For example, the TextField component has a prop errorText` for showing an individual error tip.
For building links in templates we use the <Link> component that will render an a tag with a proper href attribute.
An important concept in React is type checking of props with PropTypes. With PropTypes we set rules for props of a component: what data type expected to be passed or whether it is required or not. Setting these rules is helpful and intended to prevent making errors while developing a React application:
SignUpForm.propTypes = {
  onSubmit: PropTypes.func.isRequired,
  onChange: PropTypes.func.isRequired,
  errors: PropTypes.object.isRequired,
  user: PropTypes.object.isRequired
};
Let’s create another (almost identical to the sign-up form) component for the login form:
import React, { PropTypes } from 'react';
import { Link } from 'react-router';
import { Card, CardText } from 'material-ui/Card';
import RaisedButton from 'material-ui/RaisedButton';
import TextField from 'material-ui/TextField';


const LoginForm = ({
  onSubmit,
  onChange,
  errors,
  user
}) => (
  <Card className="container">
    <form action="/" onSubmit={onSubmit}>
      <h2 className="card-heading">Login</h2>

      {errors.summary && <p className="error-message">{errors.summary}</p>}

      <div className="field-line">
        <TextField
          floatingLabelText="Email"
          name="email"
          errorText={errors.email}
          onChange={onChange}
          value={user.email}
        />
      </div>

      <div className="field-line">
        <TextField
          floatingLabelText="Password"
          type="password"
          name="password"
          onChange={onChange}
          errorText={errors.password}
          value={user.password}
        />
      </div>

      <div className="button-line">
        <RaisedButton type="submit" label="Log in" primary />
      </div>

      <CardText>Don't have an account? <Link to={'/signup'}>Create one</Link>.</CardText>
    </form>
  </Card>
);

LoginForm.propTypes = {
  onSubmit: PropTypes.func.isRequired,
  onChange: PropTypes.func.isRequired,
  errors: PropTypes.object.isRequired,
  user: PropTypes.object.isRequired
};

export default LoginForm;
And the last presentational component that will work as a wrapper for the whole application:
import React, { PropTypes } from 'react';
import { Link, IndexLink } from 'react-router';


const Base = ({ children }) => (
  <div>
    <div className="top-bar">
      <div className="top-bar-left">
        <IndexLink to="/">React App</IndexLink>
      </div>

      <div className="top-bar-right">
        <Link to="/login">Log in</Link>
        <Link to="/signup">Sign up</Link>
      </div>

    </div>

    {children}

  </div>
);

Base.propTypes = {
  children: PropTypes.object.isRequired
};

export default Base;
The children object will be passed as a prop by a router that we will configure later.
Creating Container Components
Now we will look at creating container components in action. Containers components do the hard work: update values for showing in presentational components, validate user’s input. In our case, in containers, we also will perform AJAX requests.
Our first container component will be a component that will process the previously created the sign-up form:
import React, { PropTypes } from 'react';
import SignUpForm from '../components/SignUpForm.jsx';


class SignUpPage extends React.Component {

  /**
   * Class constructor.
   */
  constructor(props) {
    super(props);

    // set the initial component state
    this.state = {
      errors: {},
      user: {
        email: '',
        name: '',
        password: ''
      }
    };

    this.processForm = this.processForm.bind(this);
    this.changeUser = this.changeUser.bind(this);
  }

  /**
   * Change the user object.
   *
   * @param {object} event - the JavaScript event object
   */
  changeUser(event) {
    const field = event.target.name;
    const user = this.state.user;
    user[field] = event.target.value;

    this.setState({
      user
    });
  }

  /**
   * Process the form.
   *
   * @param {object} event - the JavaScript event object
   */
  processForm(event) {
    // prevent default action. in this case, action is the form submission event
    event.preventDefault();

    console.log('name:', this.state.user.name);
    console.log('email:', this.state.user.email);
    console.log('password:', this.state.user.password);
  }

  /**
   * Render the component.
   */
  render() {
    return (
      <SignUpForm
        onSubmit={this.processForm}
        onChange={this.changeUser}
        errors={this.state.errors}
        user={this.state.user}
      />
    );
  }

}

export default SignUpPage;
As you see, container components are created by extending a class from the core React.Component class.
In the constructor method, we have set the default component state. The state is a set of values only available within a component. The state initialization with default values should take place before a component is rendered.
Why do we need so-called state if we got a regular class with fields? Sure we can set values to the this-reference and then get them in any other method of the class.
At some point, we may need to re-render a component. For example, after receiving an updated list of products we need to make React re-render the component with updated values in the list. It’s the state for, we set initial values, then we update the state with the setState method and React will re-render a component.
Look at the statements at the bottom of the constructor:
this.processForm = this.processForm.bind(this);
this.changeUser = this.changeUser.bind(this);
It’s for passing the this-context, so we will have an access to class members from event handlers defined as methods.
The first event handler defined in the method called changeUser will change the component state by taking the name attribute of an input element as a key. A value for this key will be taken from a user’s input.
In the second event handler processForm, which would happen when a user submits the form, all we do at this moment is outputting current state values to the browser console.
The last method render is required for every component created as a class. In this method, we render the presentational component SignUpForm with the passed event handlers and state values as props.
The second container component will process the login form. The container at this point is almost the same as the SignUpPage container:
import React, { PropTypes } from 'react';
import LoginForm from '../components/LoginForm.jsx';


class LoginPage extends React.Component {

  /**
   * Class constructor.
   */
  constructor(props) {
    super(props);

    // set the initial component state
    this.state = {
      errors: {},
      user: {
        email: '',
        password: ''
      }
    };

    this.processForm = this.processForm.bind(this);
    this.changeUser = this.changeUser.bind(this);
  }

  /**
   * Process the form.
   *
   * @param {object} event - the JavaScript event object
   */
  processForm(event) {
    // prevent default action. in this case, action is the form submission event
    event.preventDefault();

    console.log('email:', this.state.user.email);
    console.log('password:', this.state.user.password);
  }

  /**
   * Change the user object.
   *
   * @param {object} event - the JavaScript event object
   */
  changeUser(event) {
    const field = event.target.name;
    const user = this.state.user;
    user[field] = event.target.value;

    this.setState({
      user
    });
  }

  /**
   * Render the component.
   */
  render() {
    return (
      <LoginForm
        onSubmit={this.processForm}
        onChange={this.changeUser}
        errors={this.state.errors}
        user={this.state.user}
      />
    );
  }

}

export default LoginPage;
Now we need to set a routing for the application:
import Base from './components/Base.jsx';
import HomePage from './components/HomePage.jsx';
import LoginPage from './containers/LoginPage.jsx';
import SignUpPage from './containers/SignUpPage.jsx';


const routes = {
  // base component (wrapper for the whole application).
  component: Base,
  childRoutes: [

    {
      path: '/',
      component: HomePage
    },

    {
      path: '/login',
      component: LoginPage
    },

    {
      path: '/signup',
      component: SignUpPage
    }

  ]
};

export default routes;
The routes config is a JavaScript object containing the main component, which we will use as a wrapper for the application, and an array of child routes.
As you see we have set the HomePage component as the index route of our application, the SignUpPage component for the /signup path and the LoginPage component for the /login path.
The next step will be an updating the client-side entry file. We need to include our router config and apply Material UI’s theme manager:
import React from 'react';
import ReactDom from 'react-dom';
import injectTapEventPlugin from 'react-tap-event-plugin';
import getMuiTheme from 'material-ui/styles/getMuiTheme';
import MuiThemeProvider from 'material-ui/styles/MuiThemeProvider';
import { browserHistory, Router } from 'react-router';
import routes from './routes.js';

// remove tap delay, essential for MaterialUI to work properly
injectTapEventPlugin();

ReactDom.render((
  <MuiThemeProvider muiTheme={getMuiTheme()}>
    <Router history={browserHistory} routes={routes} />
  </MuiThemeProvider>), document.getElementById('react-app'));
If your instances of Webpack (npm run bundle) and Nodemon (npm start) are still working, you should see the welcome page by entering http://localhost:3000 in a browser.
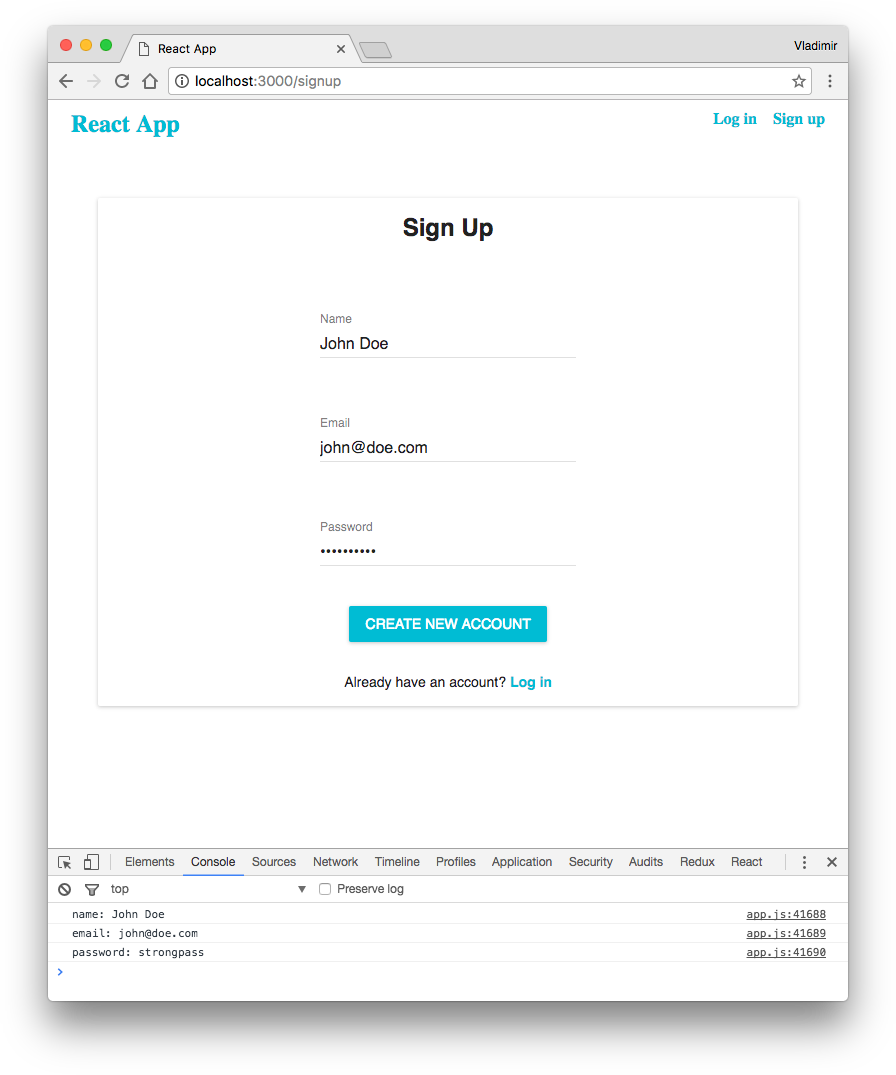
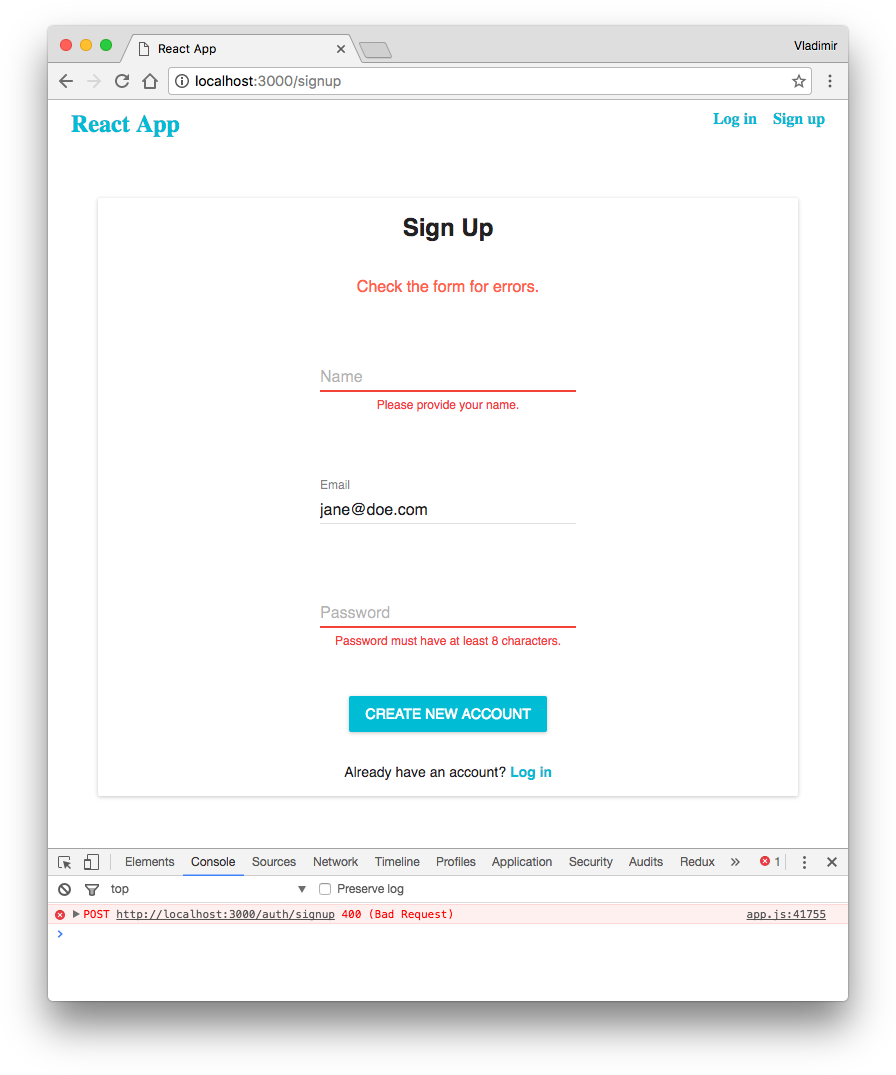
Go to the sign-up form. We have the event handler for the submit button, try to fill the fields and check an output in browser’s console.
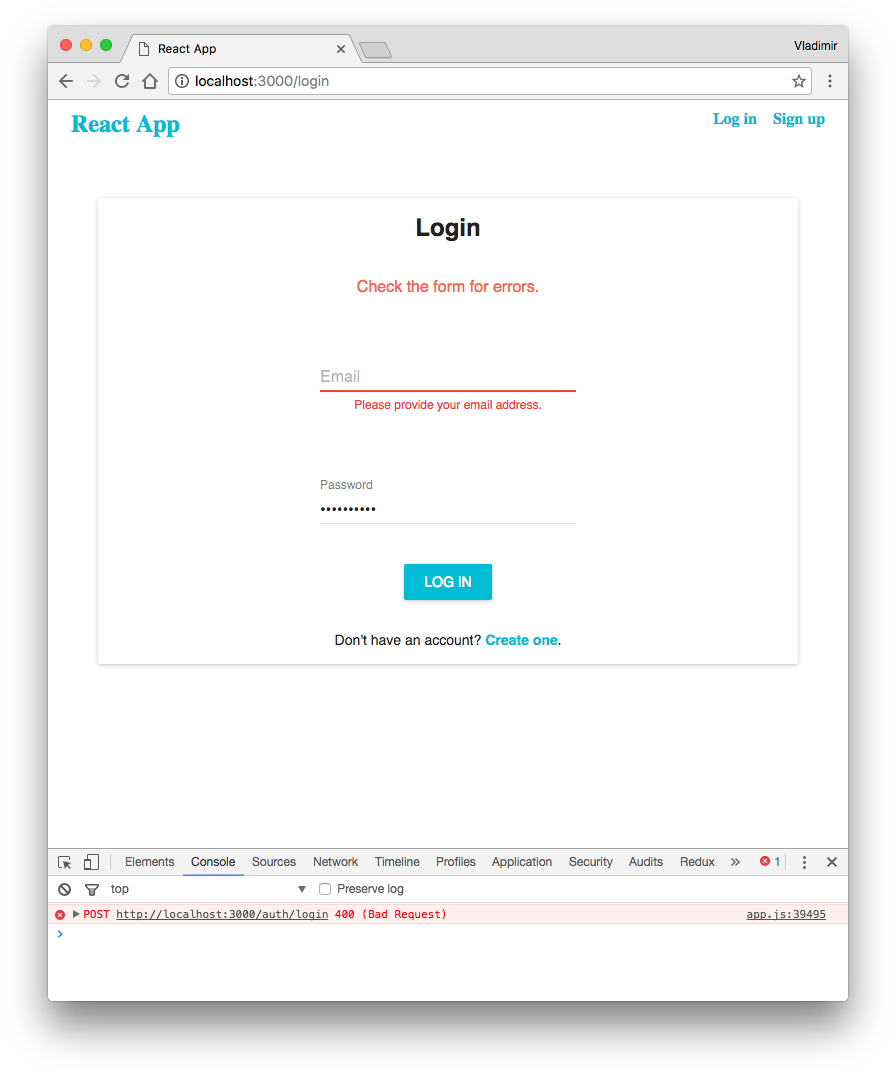
Check the login form:

Server-Side Routes
For the sake of shortness, we won’t implement the client-side validation as it’s not essential (yet, it’s very useful for UX) and will focus on the server-side one. The first thing we need to do is to be able to read a POST-data, so let’s configure our application server.
Change the index.js file to this:
const express = require('express');
const bodyParser = require('body-parser');

const app = express();
// tell the app to look for static files in these directories
app.use(express.static('./server/static/'));
app.use(express.static('./client/dist/'));
// tell the app to parse HTTP body messages
app.use(bodyParser.urlencoded({ extended: false }));

// routes
const authRoutes = require('./server/routes/auth');
app.use('/auth', authRoutes);

// start the server
app.listen(3000, () => {
  console.log('Server is running on http://localhost:3000 or http://127.0.0.1:3000');
});
We added the loading of the body-parser package and configured the application to use it. We also included routes.
Let’s create these routes for processing the form data, which we will send via AJAX requests. To include a separate file with the route rules we’ve passed the middleware app.use('/auth', authRoutes).
Save the routes:
const express = require('express');
const validator = require('validator');

const router = new express.Router();

/**
 * Validate the sign up form
 *
 * @param {object} payload - the HTTP body message
 * @returns {object} The result of validation. Object contains a boolean validation result,
 *                   errors tips, and a global message for the whole form.
 */
function validateSignupForm(payload) {
  const errors = {};
  let isFormValid = true;
  let message = '';

  if (!payload || typeof payload.email !== 'string' || !validator.isEmail(payload.email)) {
    isFormValid = false;
    errors.email = 'Please provide a correct email address.';
  }

  if (!payload || typeof payload.password !== 'string' || payload.password.trim().length < 8) {
    isFormValid = false;
    errors.password = 'Password must have at least 8 characters.';
  }

  if (!payload || typeof payload.name !== 'string' || payload.name.trim().length === 0) {
    isFormValid = false;
    errors.name = 'Please provide your name.';
  }

  if (!isFormValid) {
    message = 'Check the form for errors.';
  }

  return {
    success: isFormValid,
    message,
    errors
  };
}

/**
 * Validate the login form
 *
 * @param {object} payload - the HTTP body message
 * @returns {object} The result of validation. Object contains a boolean validation result,
 *                   errors tips, and a global message for the whole form.
 */
function validateLoginForm(payload) {
  const errors = {};
  let isFormValid = true;
  let message = '';

  if (!payload || typeof payload.email !== 'string' || payload.email.trim().length === 0) {
    isFormValid = false;
    errors.email = 'Please provide your email address.';
  }

  if (!payload || typeof payload.password !== 'string' || payload.password.trim().length === 0) {
    isFormValid = false;
    errors.password = 'Please provide your password.';
  }

  if (!isFormValid) {
    message = 'Check the form for errors.';
  }

  return {
    success: isFormValid,
    message,
    errors
  };
}

router.post('/signup', (req, res) => {
  const validationResult = validateSignupForm(req.body);
  if (!validationResult.success) {
    return res.status(400).json({
      success: false,
      message: validationResult.message,
      errors: validationResult.errors
    });
  }

  return res.status(200).end();
});

router.post('/login', (req, res) => {
  const validationResult = validateLoginForm(req.body);
  if (!validationResult.success) {
    return res.status(400).json({
      success: false,
      message: validationResult.message,
      errors: validationResult.errors
    });
  }

  return res.status(200).end();
});


module.exports = router;
In the file, we’ve set the two POST-method routes, for /auth/signup and for /auth/login. Also, we added the validation functions with basic rules to check if passed data contains a valid email address and to ensure if a password contains at least 8 characters. We should get an HTTP response with the status code 400 (bad request) and a JSON object containing error messages if validation doesn’t pass. If everything is okay and validation passes, we will get an HTTP response with the status code 200 (success).
It’s the time to add AJAX requests to our components. Change the SignUpPage container component:
import React, { PropTypes } from 'react';
import SignUpForm from '../components/SignUpForm.jsx';


class SignUpPage extends React.Component {

  /**
   * Class constructor.
   */
  constructor(props) {
    super(props);

    // set the initial component state
    this.state = {
      errors: {},
      user: {
        email: '',
        name: '',
        password: ''
      }
    };

    this.processForm = this.processForm.bind(this);
    this.changeUser = this.changeUser.bind(this);
  }

  /**
   * Change the user object.
   *
   * @param {object} event - the JavaScript event object
   */
  changeUser(event) {
    const field = event.target.name;
    const user = this.state.user;
    user[field] = event.target.value;

    this.setState({
      user
    });
  }

  /**
   * Process the form.
   *
   * @param {object} event - the JavaScript event object
   */
  processForm(event) {
    // prevent default action. in this case, action is the form submission event
    event.preventDefault();

    // create a string for an HTTP body message
    const name = encodeURIComponent(this.state.user.name);
    const email = encodeURIComponent(this.state.user.email);
    const password = encodeURIComponent(this.state.user.password);
    const formData = `name=${name}&email=${email}&password=${password}`;

    // create an AJAX request
    const xhr = new XMLHttpRequest();
    xhr.open('post', '/auth/signup');
    xhr.setRequestHeader('Content-type', 'application/x-www-form-urlencoded');
    xhr.responseType = 'json';
    xhr.addEventListener('load', () => {
      if (xhr.status === 200) {
        // success

        // change the component-container state
        this.setState({
          errors: {}
        });

        console.log('The form is valid');
      } else {
        // failure

        const errors = xhr.response.errors ? xhr.response.errors : {};
        errors.summary = xhr.response.message;

        this.setState({
          errors
        });
      }
    });
    xhr.send(formData);
  }

  /**
   * Render the component.
   */
  render() {
    return (
      <SignUpForm
        onSubmit={this.processForm}
        onChange={this.changeUser}
        errors={this.state.errors}
        user={this.state.user}
      />
    );
  }

}

export default SignUpPage;
We added an AJAX request to the processForm method. In the method, we change the component state values depending on an HTTP response status code.
Similar to the sign-up page container we will change the login form container:
import React, { PropTypes } from 'react';
import LoginForm from '../components/LoginForm.jsx';
class LoginPage extends React.Component {
/**
* Class constructor.
*/
constructor(props) {
super(props);
// set the initial component state
this.state = {
errors: {},
user: {
email: '',
password: ''
}
};
this.processForm = this.processForm.bind(this);
this.changeUser = this.changeUser.bind(this);
}
/**
* Process the form.
*
* @param {object} event - the JavaScript event object
*/
processForm(event) {
// prevent default action. in this case, action is the form submission event
event.preventDefault();
// create a string for an HTTP body message
const email = encodeURIComponent(this.state.user.email);
const password = encodeURIComponent(this.state.user.password);
const formData = `email=${email}&password=${password}`;
// create an AJAX request
const xhr = new XMLHttpRequest();
xhr.open('post', '/auth/login');
xhr.setRequestHeader('Content-type', 'application/x-www-form-urlencoded');
xhr.responseType = 'json';
xhr.addEventListener('load', () => {
if (xhr.status === 200) {
// success
// change the component-container state
this.setState({
errors: {}
});
console.log('The form is valid');
} else {
// failure
// change the component state
const errors = xhr.response.errors ? xhr.response.errors : {};
errors.summary = xhr.response.message;
this.setState({
errors
});
}
});
xhr.send(formData);
}
/**
* Change the user object.
*
* @param {object} event - the JavaScript event object
*/
changeUser(event) {
const field = event.target.name;
const user = this.state.user;
user[field] = event.target.value;
this.setState({
user
});
}
/**
* Render the component.
*/
render() {
return (
<LoginForm
onSubmit={this.processForm}
onChange={this.changeUser}
errors={this.state.errors}
user={this.state.user}
/>
);
}
}
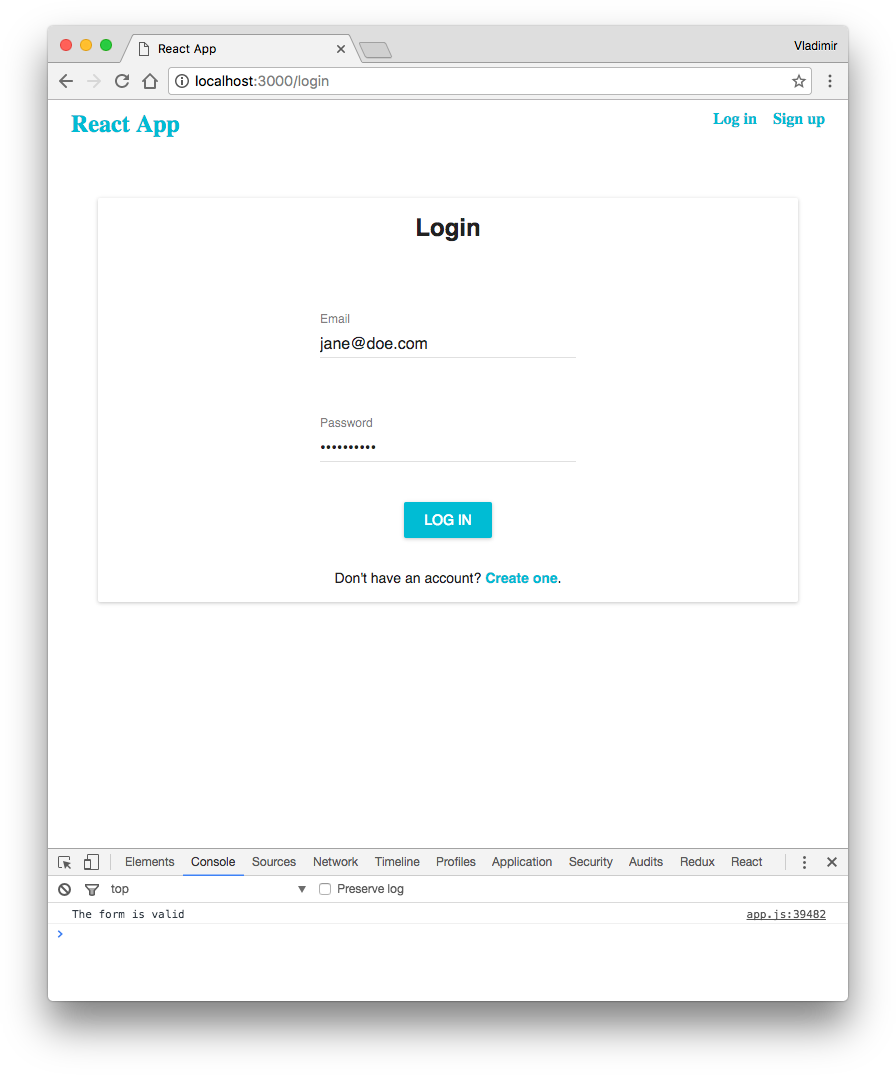
export default LoginPage;Let’s see the components in action. In a browser, try to submit sign-up form the form with the empty fields or with a very short password.
If the form is valid you should see the phrase ‘The form is valid’ in console:

Check if the login form works properly too.
Conclusion
This part of the tutorial covered essentials concepts of JSX syntax, React components, state and props values. It’s also showed how to use tools like Webpack.
In the next part, we will continue to build the application and implement the authentication layer using an email address.